读取wgrib2变量表格
本文将探讨 wgrib2 显示的变量名从何而来。
介绍
使用 wgrib2 浏览 GRAPES GFS 的 GRIB 2 文件,会展示如下输出:
wgrib2 gmf.gra.2021092900003.grb2
1:0:d=2021092900:ACPCP:surface:0-3 hour acc fcst:
2:1006387:d=2021092900:NCPCP:surface:0-3 hour acc fcst:
3:1804937:d=2021092900:APCP:surface:0-3 hour acc fcst:
4:3100143:d=2021092900:ASNOW:surface:0-3 hour acc fcst:
5:3682085:d=2021092900:TMP:surface:3 hour fcst:
6:4408726:d=2021092900:NLWRF:surface:0-3 hour acc fcst:
7:5701054:d=2021092900:NSWRF:surface:0-3 hour acc fcst:
8:6186835:d=2021092900:HFLUX:surface:3 hour fcst:
9:6935173:d=2021092900:LHTFL:surface:0-3 hour acc fcst:
10:7726184:d=2021092900:ULWRF:surface:3 hour fcst:
11:8727007:d=2021092900:ULWRF:top of atmosphere:3 hour fcst:
12:10070648:d=2021092900:var discipline=0 master_table=4 parmcat=5 parm=8:surface:3 hour fcst:
13:11037044:d=2021092900:var discipline=0 center=38 local_table=1 parmcat=5 parm=224:surface:3 hour fcst:
# ...skip...
输出结果是一个表格,每行表示一个要素场,冒号 : 为分隔符。
其中第四个字段是要素场变量名,分为两类:
- 有名称,直接显示变量名称字符串,例如
ACPCP,TMP - 无名称,使用多个键值对表示,例如
var discipline=0 center=38 local_table=1 parmcat=5 parm=224
下面将介绍 wgrib2 中内置的变量名在哪里,并尝试使用 Python 读取 wgrib2 内置的变量表格。
wgrib2 内置变量表
使用 ecCodes 需要设置环境变量 ECCODES_DEFINITION_PATH,指向定义文件目录。
定义文件中包含保存变量名称信息的 shortName.def 文件,ecCodes 源码内部没有显式保存变量信息。
而使用 wgrib2 则无需设置环境变量,也不需要额外的定义文件,所以 wgrib2 中的变量信息一定保存在源代码中。
查看源码目录,发现几个以 .dat 结尾的文件:gribtable.dat,BOM_gribtable.dat,MRMS_gribtable.dat,NDFD_gribtable.dat 和 tigge_gribtable.dat。
这几个文件正是 wgrib2 内置的变量表格。
gribtable.dat 文件内容如下:
{0,0,0,255,7,1,7,193, "4LFTX", "Best (4 layer) Lifted Index", "K"},
{0,1,0,255,0,0,7,11, "4LFTX", "Best (4 layer) Lifted Index", "K"},
{0,0,0,255,7,1,3,197, "5WAVA", "5-Wave Geopotential Height Anomaly", "gpm"},
// ...skip...
{4,1,0,255,0,0,8,0, "XRAYRAD", "X-Ray Radiance", "W/sr/m^2"},
{4,1,0,255,0,0,6,2, "XSHRT", "Solar X-ray Flux (XRS Short)", "W/m^2"},
{10,1,0,255,0,0,2,10, "ZVCICEP", "Zonal Vector Component of Vertically Integrated Ice Internal Pressure", "Pa*m"},
各字段含义可以从 wgrib.h 头文件中的 gribtable_s 结构体中找到:
struct gribtable_s {
  int disc;   /* Section 0 Discipline                                */
  int mtab_set;    /* Section 1 Master Tables Version Number used by set_var      */
  int mtab_low;    /* Section 1 Master Tables Version Number low range of tables  */
  int mtab_high;   /* Section 1 Master Tables Version Number high range of tables */
  int cntr;   /* Section 1 originating centre, used for local tables */
  int ltab;   /* Section 1 Local Tables Version Number               */
  int pcat;   /* Section 4 Template 4.0 Parameter category           */
  int pnum;   /* Section 4 Template 4.0 Parameter number             */
  const char *name;
  const char *desc;
  const char *unit;
};
读取变量表
.dat 中的内容是 C 语言格式,想要在 Python 中使用,可以将每行的 {} 替换成 (),这样就可以按元组形式放到列表中。
gribtable.dat 文件经转换后形成 PARAMETER_TABLE 列表:
PARAMETER_TABLE = [
    (0, 0, 0, 255, 7, 1, 7, 193, "4LFTX", "Best (4 layer) Lifted Index", "K"),
    (0, 1, 0, 255, 0, 0, 7, 11, "4LFTX", "Best (4 layer) Lifted Index", "K"),
    (0, 0, 0, 255, 7, 1, 3, 197, "5WAVA", "5-Wave Geopotential Height Anomaly", "gpm"),
    # ...skip...
    (4, 1, 0, 255, 0, 0, 8, 0, "XRAYRAD", "X-Ray Radiance", "W/sr/m^2"),
    (4, 1, 0, 255, 0, 0, 6, 2, "XSHRT", "Solar X-ray Flux (XRS Short)", "W/m^2"),
    (10, 1, 0, 255, 0, 0, 2, 10, "ZVCICEP", "Zonal Vector Component of Vertically Integrated Ice Internal Pressure", "Pa*m"),
]
按同样的操作转换其他 .dat 文件,将多个文件内容合并成一个列表:
WGRIB_PARAMETER_TABLE = PARAMETER_TABLE + NDFD_PARAMETER_TABLE + MRMS_PARAMETER_TABLE
将合并后的列表转为 pandas.DataFrame 对象
table = pd.DataFrame(
    WGRIB_PARAMETER_TABLE,
    columns=[
        "discipline",
        "master_table_version_set",
        "master_table_version_low",
        "master_table_version_high",
        "centre",
        "localTablesVersion",
        "parameterCategory",
        "parameterNumber",
        "shortName",
        "description",
        "unit"
    ]
)
本文只关注 GRAPES 模式,所以删掉不用的列:
param_table = table.drop(
    columns=[
        "master_table_version_set",
        "master_table_version_low",
        "master_table_version_high",
        "centre",
        "localTablesVersion"
    ]
)
将表格重新排序
param_table.sort_values([
    "discipline",
    "parameterCategory",
    "parameterNumber"
], inplace=True, ignore_index=True)
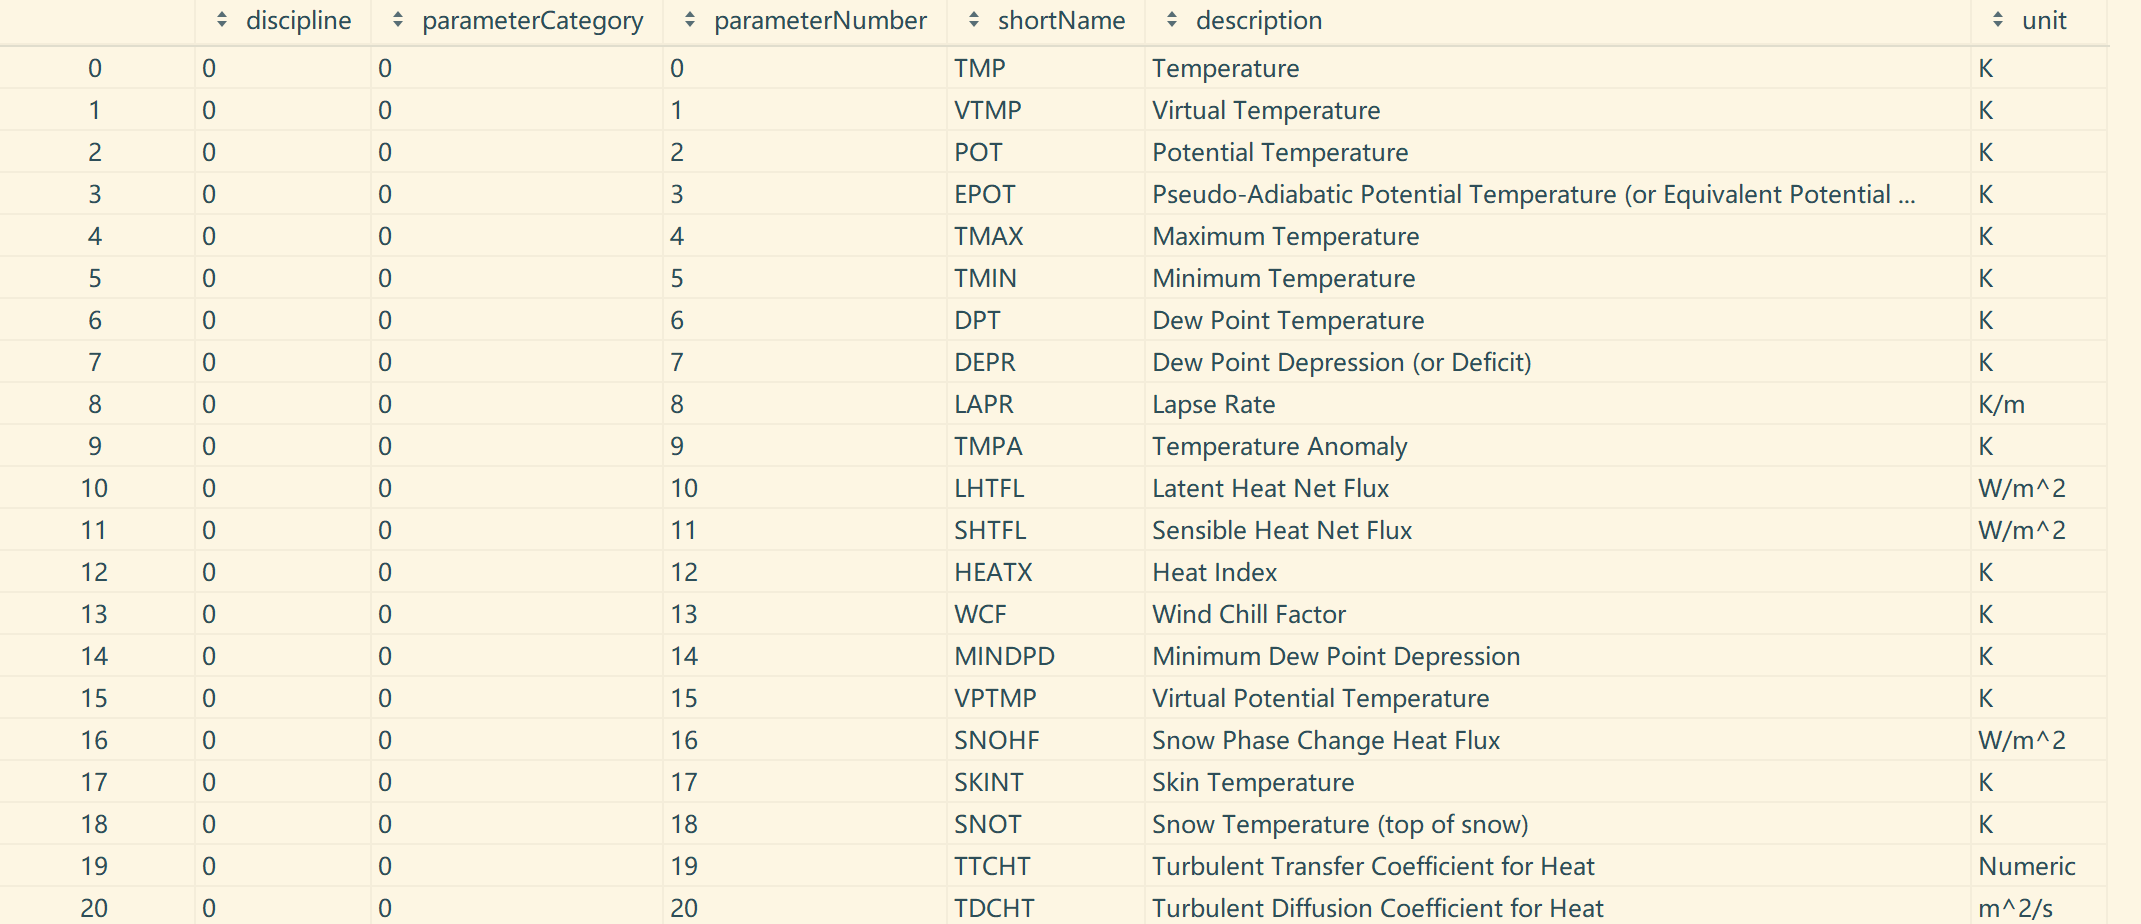
生成的表格如下所示:

WGRIB2 变量表格,仅展示前 20 行,截图来自 PyCharm
应用
nwpc-oper/nwpc-data 内置部分 WGRIB2 变量表格,并包含 GRAPES 模式自定义的部分变量名。
nwpc-data 内部将变量表格的 CSV 文件内容保存到字符串 _SHORT_NAME_TABLE_CONTENT 中。
_SHORT_NAME_TABLE_CONTENT = """short_name,discipline,parameterCategory,parameterNumber
ACPCP,0,1,10
ALBDO,0,19,1
APCP,0,1,8
ASNOW,0,1,29
BLI,0,7,1
CAPE,0,7,6
...skip...
"""
使用 pandas 解析该字符串,得到变量表格 SHORT_NAME_TABLE
import io

def _get_short_name_table() -> pd.DataFrame:
    f = io.StringIO(_SHORT_NAME_TABLE_CONTENT)
    df = pd.read_table(
        f,
        header=0,
        sep=",",
    )
    return df
当要素名参数 parameter 为字符串时,nwpc-data 会首先在 SHORT_NAME_TABLE 查找是否有该 short_name 存在。
如果存在,则返回由 discipline,parameterCategory 和 parameterNumber 构成的 dict 对象。
def _convert_parameter(parameter: Union[str, Dict]) -> Union[str, Dict]:
    if isinstance(parameter, str):
        df = SHORT_NAME_TABLE[SHORT_NAME_TABLE["short_name"] == parameter]
        if df.empty:
            return parameter
        else:
            return df.iloc[0].drop("short_name").to_dict()
    else:
        return parameter
所以 nwpc-data 的 GRIB 系列 API 接口支持 WGRIB2 变量名:
field = load_field_from_file(
    file_path=file_path,
    parameter="TCDC",
)
另外,NWPC 数据平台 Python API 接口也已支持 WGRIB2 变量名。
